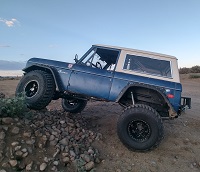
My 73 Ranger Project
78 posts
• Page 3 of 3 • 1, 2, 3
Re: My 73 Ranger Project
Thanks, felt the karate kid except it was door on, door off....
73 Ranger (Holy Crap, replacing the door post is so much fun!)
-

kbank6 - Official CCB Member

- Posts: 306
- Joined: Sun Apr 14, 2013 4:00 pm
- Location: Greeley, CO
Re: My 73 Ranger Project
When I did my driver's door post I'm pretty sure I did that 30 times. Lift off hinges were the best investment ever.
-

Justin - Official CCB Member

- Posts: 6198
- Images: 0
- Joined: Sat Oct 09, 2010 11:04 pm
- Location: Lakewood
Re: My 73 Ranger Project
Need a little help on a measurement. I took the old cross member out of the front and took measurements. I was fitting the new one in the frame and wanted to make sure that it was correct so I goggled the frame dimensions and the only width measurement I found was 27 inches and it looks like they are in the center of the hole. I get 27 inches from outside hole to outside hole. If I was to go from the center then I would have a major gap to fill. So, if anyone has this or can get this I would really aappreciate it.
You do not have the required permissions to view the files attached to this post.
73 Ranger (Holy Crap, replacing the door post is so much fun!)
-

kbank6 - Official CCB Member

- Posts: 306
- Joined: Sun Apr 14, 2013 4:00 pm
- Location: Greeley, CO
Re: My 73 Ranger Project
Got it, thanks
73 Ranger (Holy Crap, replacing the door post is so much fun!)
-

kbank6 - Official CCB Member

- Posts: 306
- Joined: Sun Apr 14, 2013 4:00 pm
- Location: Greeley, CO
Re: My 73 Ranger Project
I got the passenger side done except fot the rear corners, cut and welded that new crossmember then got happy with a cut off wheel on the drivers side. I Found that I had quite a few bad spots on the driver side cowl so I'll get that cut out as well.
With sales going on I'm trying to decide on Zero Rust, Chassis Saver, Rust bullet or maybe POR15 for my undercoating. Anyone have any bad experiences with any of them?
With sales going on I'm trying to decide on Zero Rust, Chassis Saver, Rust bullet or maybe POR15 for my undercoating. Anyone have any bad experiences with any of them?
You do not have the required permissions to view the files attached to this post.
73 Ranger (Holy Crap, replacing the door post is so much fun!)
-

kbank6 - Official CCB Member

- Posts: 306
- Joined: Sun Apr 14, 2013 4:00 pm
- Location: Greeley, CO
Re: My 73 Ranger Project
I used Chassis Saver on my axles a few years ago. I'm happy with the results. Only brake fluid (and rocks) has damaged the finish. I haven't used anything else, but with the Chassis Saver, you just wire wheel the crud off & paint right on. I used a primer gun to spray my stuff.
You do not have the required permissions to view the files attached to this post.
"America is at that awkward stage. It's too late to work within the system, but too early to shoot the bastards." – Claire Wolfe
74-AWB 98", ZF5, Atlas4, TGW HP1060 and HP1014 axles, ARBs, 37's, 3.5" lift-5.5" front coil springs, Tahoe rear springs, EFI 302, h-boost, York OBA, 4x4x2, custom dash & gauges
72 U15- Explorer Sport-Candyapple Red (1 of 141)
74-AWB 98", ZF5, Atlas4, TGW HP1060 and HP1014 axles, ARBs, 37's, 3.5" lift-5.5" front coil springs, Tahoe rear springs, EFI 302, h-boost, York OBA, 4x4x2, custom dash & gauges
72 U15- Explorer Sport-Candyapple Red (1 of 141)
-

Gunnibronco - Official CCB Member

- Posts: 4074
- Joined: Mon Jan 03, 2011 5:07 pm
- Location: Gardnerville, NV
Re: My 73 Ranger Project
I used Hammerite on my rear axle and welding table. It takes forever to fully dry (it's a little soft for a few weeks), but is absurdly durable after it cures. I like the hammered finish, but it's available in smooth as well.
-

Justin - Official CCB Member

- Posts: 6198
- Images: 0
- Joined: Sat Oct 09, 2010 11:04 pm
- Location: Lakewood
Re: My 73 Ranger Project
I used Chassis Saver and am really impressed with how durable it is.
1977 Sport, 351w OBDII EFI motor, 4R70W auto, 4:88 gears, ARB lockers, 3.5" suspension, 33" tires.
-

Rox Crusher - Official CCB Member

- Posts: 3980
- Joined: Sun Oct 10, 2010 4:36 pm
- Location: Roxborough Park, Colorado
Re: My 73 Ranger Project
Kinda leaning towards the Chassis Saver and they have tint that can be added to the mix. I am going with a Land Rover green so I was going to get a paint chip from them to see how close it would be but still a long way from that. Just trying to pre plan as much as I can. Thanks
73 Ranger (Holy Crap, replacing the door post is so much fun!)
-

kbank6 - Official CCB Member

- Posts: 306
- Joined: Sun Apr 14, 2013 4:00 pm
- Location: Greeley, CO
Re: My 73 Ranger Project
So I was replacing the drivers side kick panel I noticed that the rust was bad under the cowl. I removed the cowl and made a new section of cowl mount. Well, when I went to put on the upper cowl, I found that the new cowl is to long. I'm not going to try and get a correct size if there is such a thing so a triming might be in order. Oh, I bought it from Toms...
It's been nice to get back on it after selling my OBS F250 7.3 and getting a 01 F350 7.3 with low miles. Now it has been upgrade time on the newer one.
It's been nice to get back on it after selling my OBS F250 7.3 and getting a 01 F350 7.3 with low miles. Now it has been upgrade time on the newer one.
You do not have the required permissions to view the files attached to this post.
73 Ranger (Holy Crap, replacing the door post is so much fun!)
-

kbank6 - Official CCB Member

- Posts: 306
- Joined: Sun Apr 14, 2013 4:00 pm
- Location: Greeley, CO
Re: My 73 Ranger Project
Finding parts that fit these days seems to be impossible. Plenty of people making parts. Very few making anything of quality.
Stroppe'd
1972 Sport, 302, 3 speed with old school Duff floor shifter, T shift Dana 20 with JB Fab twin stick, 4.11 gears with Trac-loc, Lincoln hydroboost, Chevy disc conversion, WH gas lift gate shock kit, 33" Duratrac tires on slots and about 2.5" of lift, Stroppe installed: bumper braces, dual shocks on all four corners, GM power steering, trans cooler mount, auto shift column, rollbar.
The Terrible One
1972 Sport uncut, 302, C4 with 1974 column , T shift Dana 20, 3.50 gears w/ limited slip, 1966 U13 Roadster kick panel, and factory power steering.
1973 Stroppe Baja project
-

akaFrankCastle - Official CCB Member

- Posts: 4901
- Images: 0
- Joined: Wed Oct 27, 2010 5:25 pm
- Location: Colorado Springs
Re: My 73 Ranger Project
I'm having a little trouble with the door post/door alignment that maybe someone can help me out. I have set the post up between the original measurement and the measurement off of a sheet that has been posted up before. Looking at the pictures you can see the rear gag is about a 1/4 inch if not a little more. The top is pretty level but when you look at the windshiel frame to door window frame is where my issue is.
Any ideas as to how I can get the gap on the door frame to windshield frame closer?
Any ideas as to how I can get the gap on the door frame to windshield frame closer?
You do not have the required permissions to view the files attached to this post.
73 Ranger (Holy Crap, replacing the door post is so much fun!)
-

kbank6 - Official CCB Member

- Posts: 306
- Joined: Sun Apr 14, 2013 4:00 pm
- Location: Greeley, CO
Re: My 73 Ranger Project
Can you move the door hinges inwards a little bit to close that gap? Do you have your door rubber installed yet? That may help too.
69 Wagon, 351W, Explorer EFI & Serpentine, ZF5, 35" tires, 3.5 SL, 2 BL, WARN 8274
-

Eck - Official CCB Member

- Posts: 2460
- Joined: Thu Oct 25, 2012 8:33 pm
Re: My 73 Ranger Project
Good pics.
It looks to me like:
Door to quarter gap is wider at the top than the bottom
Windshield to door is wider at the bottom than the top
Door to top gap is wider at the front than the back
If this is correct, I'd do the following:
1. Remove the striker post, if its installed. Make sure all weather strip is installed.
2. Push the top of the door back, until the door/quarter gap is even. You can do this by shimming the outside hinge/a-pillar bolts, and/or push the top of the a-pillar back. Hopefully the gap does not end up too tight or you'll have to play with the bottom hinge/a-pillar too. Get this gap square first. This should also square up the door/top & door/windshield frame gaps. But it will misalign the door to the quarter bodylines, it will be too low.
3. Lift the door straight up (slot the holes in the hinge if necessary) until the top of the door lines back up with the top of the quarter. This should tighten up the top/door gap & door/windshield gap. Hopefully that gets things right.
Check if the door shuts squarely against all the weatherstripping all the way around the door. If its misaligned then, take more pics, and I'll try to help.
Don't install the striker until everything is right. Then put the striker where it doesn't pull the door up or down, and shuts tight, but not too tight.
"America is at that awkward stage. It's too late to work within the system, but too early to shoot the bastards." – Claire Wolfe
74-AWB 98", ZF5, Atlas4, TGW HP1060 and HP1014 axles, ARBs, 37's, 3.5" lift-5.5" front coil springs, Tahoe rear springs, EFI 302, h-boost, York OBA, 4x4x2, custom dash & gauges
72 U15- Explorer Sport-Candyapple Red (1 of 141)
74-AWB 98", ZF5, Atlas4, TGW HP1060 and HP1014 axles, ARBs, 37's, 3.5" lift-5.5" front coil springs, Tahoe rear springs, EFI 302, h-boost, York OBA, 4x4x2, custom dash & gauges
72 U15- Explorer Sport-Candyapple Red (1 of 141)
-

Gunnibronco - Official CCB Member

- Posts: 4074
- Joined: Mon Jan 03, 2011 5:07 pm
- Location: Gardnerville, NV
Re: My 73 Ranger Project
I will give that a shot tonight depending on the days schedule. Thanks for the help.
73 Ranger (Holy Crap, replacing the door post is so much fun!)
-

kbank6 - Official CCB Member

- Posts: 306
- Joined: Sun Apr 14, 2013 4:00 pm
- Location: Greeley, CO
Re: My 73 Ranger Project
Well I brought the door a little closer to the striker post and the door post but still have that gap on the lower part off the wing window.
1.If I lower the rear of the door the that will bring the top of the window frame closer to the hard top.
2. If I bring the fron ot the door up then the front top of the door window frame hit the front section of the hard top.
I can line of the rear of the door to the stricker and get the very top of the window frame pretty level however I have the super gap. I know the picture with the rear of the door to the striker post looks misalligned but the bottom is sitting closer to the inner rocker.
So where can I go to from here?
You do not have the required permissions to view the files attached to this post.
73 Ranger (Holy Crap, replacing the door post is so much fun!)
-

kbank6 - Official CCB Member

- Posts: 306
- Joined: Sun Apr 14, 2013 4:00 pm
- Location: Greeley, CO
Re: My 73 Ranger Project
Well, that is tough.
If your door is square to the rear quarter & hard top, the problem seems to be at the base of the windshield. It seems the cowl/a-pillar needs pulled back towards the rear quarter. But at the same time, the door post will have to be pushed forward to keep the door where it is now. You need to move the window frame back, but not the door.
If you are pulling on the a-pillar much, loosen the body mounts under the core support, this will help things move a little.
Something seems out of whack.
Measuring diagonally across the truck, like from "A" on the driver side -> "C" on the passenger side, and comparing it to "A" passenger side -> "C" driver side will tell you if you are square. Any 2 easily measurable points will work for the comparison, you don't have to use any of those from the picture. I wouldn't use a point on the door post (B), use a point at the base of the windshield (hinge) or the pinchweld at the top of the door opening. And I'd measure from the windshield hinge back to point "C" on both sides and compare
I'd also keep an eye on the diagonal measurements across the hood opening. Pulling on the a-pillar will change these measurements. You want them to end up square as well. The core support can be pushed around a bit later. Without a square tub/cowl/door opening, you can be sure your hood opening/fender alignment won't be easy.
You do not have the required permissions to view the files attached to this post.
"America is at that awkward stage. It's too late to work within the system, but too early to shoot the bastards." – Claire Wolfe
74-AWB 98", ZF5, Atlas4, TGW HP1060 and HP1014 axles, ARBs, 37's, 3.5" lift-5.5" front coil springs, Tahoe rear springs, EFI 302, h-boost, York OBA, 4x4x2, custom dash & gauges
72 U15- Explorer Sport-Candyapple Red (1 of 141)
74-AWB 98", ZF5, Atlas4, TGW HP1060 and HP1014 axles, ARBs, 37's, 3.5" lift-5.5" front coil springs, Tahoe rear springs, EFI 302, h-boost, York OBA, 4x4x2, custom dash & gauges
72 U15- Explorer Sport-Candyapple Red (1 of 141)
-

Gunnibronco - Official CCB Member

- Posts: 4074
- Joined: Mon Jan 03, 2011 5:07 pm
- Location: Gardnerville, NV
Re: My 73 Ranger Project
I'll see if I have a chance to get to it this weekend as I have and exhaust plus exhaust brake and air compressor to put on the 01 super duty. Thanks
73 Ranger (Holy Crap, replacing the door post is so much fun!)
-

kbank6 - Official CCB Member

- Posts: 306
- Joined: Sun Apr 14, 2013 4:00 pm
- Location: Greeley, CO
78 posts
• Page 3 of 3 • 1, 2, 3
Return to General 4x4 Technical
Who is online
Users browsing this forum: No registered users and 6 guests
