Jesus_man wrote:Assuming the dangly thing next to the bump stop is the apparatus you are using to limit travel? I've not seen that device before. Any more info?
Yes its a limit strap clevis, this give you some adjustment on "stretch" and fine tuning, not that I'll ever stretch the straps in my life time but its a cool item I needed lol https://www.kartek.com/parts/adjustable ... traps.html
Ahh, ok, so the spring is there to keep things from rattling? I was wondering if the spring was supposed to be on top to keep tension on the limiting strap.
1973 Bronco, 351 SEFI, Locked, discs, 35's ZF-5spd and Atlas 4spd. 235:1 Crawl Ratio. It may be ugly, but it's slow. http://www.ucora.org
Jesus_man wrote:Ahh, ok, so the spring is there to keep things from rattling? I was wondering if the spring was supposed to be on top to keep tension on the limiting strap.
From everything I've read/seen yes the spring is for tension but is installed on the bottom and then double nuts on the top. this allows for about 2" of adjustment. When setting droop limit let say 8" you should get a 7" strap due to the 1" stretch and the clevis just gives you the flexibility to adjusted rather than just having two fixed points. That's my .02 cents for what is worth
Steve, LetΓÇÖs chat soon about your engine swap again. IΓÇÖm contemplating switching to a 4R70W and IΓÇÖm thinking you were going to keep the c4. If so, I have the engine harness with all of the transmission stuff removed. Depending on timeframe, maybe we can work something out.
Tim
ΓÇ£BuddyΓÇ¥ - 1975 Bronco Sport, 302/Viperbuilt 4R70W/D20, Explorer EFI, More Patina than Paint...
BroncoRaider wrote:Steve, LetΓÇÖs chat soon about your engine swap again. IΓÇÖm contemplating switching to a 4R70W and IΓÇÖm thinking you were going to keep the c4. If so, I have the engine harness with all of the transmission stuff removed. Depending on timeframe, maybe we can work something out.
Tim
Hey Tim, I'm running a 302/4R70W with Garry's wire harness and computer set up.
Inner fender wheel wells are now completed and I wish that task on no one !
I used 14g aluminum for the front portion/hoops and 20 gauge galvannealed steel for the rears. The rear air vents are stainless steel and there will be a aluminum trim to finish it off along with cover plates if needed. The inner fenders are not air/water tight but will help keep the motor area from getting too dirty I hope. My plans are to keep the aluminum raw and paint the steel with rustoleum hammer black just like the frame.
Next steps are to mockup the motor components/wire harness (once I can find it lol)
You do not have the required permissions to view the files attached to this post.
My original thought of using a OEM Benz air box didn't work out with the inner fender wells as both side would not be somewhat symmetrical and that air box just didn't look at home in the engine bay. I could have just bought a aftermarket tube/cone filter and be done with it, but I had no plans for the past 3-weeks!
So being stubborn headed I rolled my own tubing and make a cold air box. My first design was to incorporate a "prefilter" for dusty conditions but then realized that I would be restricting too much air flow, so for now I'll be running a K&N oil filter for most of the time and have a Airaid dry filter with a pre-filter sock for dusty trails.
You do not have the required permissions to view the files attached to this post.
Dang its been 2 months since updates, nothing really ground breaking going on with the build I almost have all the engine/dash wiring dialed in, the sad part is it all has to all come back out in order to fully paint/weld the engine cage modifications. On a side note I wasn't happy with the 5-KC light and changed the design to 6 . I'm not sure if the alternator will handle it but its "look" I've always liked.
You do not have the required permissions to view the files attached to this post.
you should be able to light up the night with those lights. Wiring is my arch nemesis! I completely rewired my Bronco, I almost gave up on it daily during that project.
Thanks Jesus_man Yes they are incandescent, good point on the LED I'll have to check the cost. Also I checked the air box and I'm good for 30" so at 31" things will go really really bad
I finally finished up the engine wiring along with finding a place to locate the 96 explorer trans-cooler and power steering cooler. I also decided to ditch the oem glove box and make my own in order to place all KC light relays. Then pulled everything back out so I could fully weld the engine cage and paint the block. Picking up some new motor mounts at Napa on the way home today and dropping it back in for the final time!!
You do not have the required permissions to view the files attached to this post.
I finally removed the engine cage/parts and wiring in order to fully weld and paint the steel panels its a great feeling to install the engine cage for the final time using lock washer! The last couple of weeks have been crappy weather for HVLP painting so I worked on trimming the carpet padding and fitting the OEM rubber matting (I forgot to take pics). This Sat was my 1 day opportunity to finally paint the dash I had already primed and prepped the parts several weeks ago so they just needed base/clear. Another milestone installing the dash for the last time!!!!
You do not have the required permissions to view the files attached to this post.
I installed the dash pad, glove box relays along with cleaning up the OEM vent tubing. I was getting ready to bolt the glove box plate and remembered that all the wiring needs to be routed in front of the passenger A pillar so now I need to remove everything again
You do not have the required permissions to view the files attached to this post.
I hope the rest of the build isn't as difficult as the dash! The original routing for the heater cable seemed to be too low under the computer box so going on top seemed the least binding, I'm sure I'll run into issues and have to take the dash out again at some point lol
You do not have the required permissions to view the files attached to this post.
I made up some heat shields for the passenger fire wall/floor boards since that's where my "plan" is to run the exhaust. 1/8" aluminum sheets with 5/8" air gap. Installed the Jute padding and now ready to lay down the rubber matting.
You do not have the required permissions to view the files attached to this post.




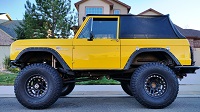

 . I'm not sure if the alternator will handle it but its "look" I've always liked.