Page 4 of 19
Re: build thread from the freezer
Posted: Mon Jul 06, 2015 4:04 pm
by Gunnibronco
Unaweep wrote:I need to come by and see how your built that sub-frame for the front. I need to build one for mine.
Erik
Anytime you are around Gunni, let me know!
Re: build thread from the freezer
Posted: Sun Jul 12, 2015 8:22 pm
by Gunnibronco
More progress.
Very happy with the battery location. I decided to ditch the fresh air feed to the heater, because it was always clogged with snow in the winter. Once that was gone this seemed like the best location for the battery. I haven't seen anyone put the battery in the cowl and keep the heater. The heater will be about 1" from the sheet metal once its rebuilt.
Took a set of donated (thanks Kirk!) inner fenders and trimmed them up in an attempt to have some protection from rocks/ice/water/etc, and some real estate to mount junk (starter relay, air compressor switch, etc). I didn't like the idea of my battery & air intake exposed. In the pics, the inner fenders are just clamped up, not in a final location. Also started on the front panel behind the grill. Also stuck a couple hood bumpers to the tube, I'll add hood pins later, once the fenders are really installed.
P1020892small.jpg
P1020893small.jpg
P1020895small.jpg
P1020897small.jpg
Re: build thread from the freezer
Posted: Mon Jul 13, 2015 2:00 am
by Jesus_man
Great progress!! Keep at it!
Re: build thread from the freezer
Posted: Mon Jul 13, 2015 5:06 am
by ZOSO
I'd suggest making the inner fenders bigger. Stretch them front to rear a little bit(2") to allow room for 37's. It also looks like you have them raised from stock height which is also good.
Re: build thread from the freezer
Posted: Mon Jul 13, 2015 6:23 am
by Gunnibronco
Thanks,
The inner fenders are higher up than normal, and I've cut off the bottom 3"+, so I think everything should clear. But I was going to cycle the suspension before final assembly. If everything fits with my 33's, it should fit with 37's and a 2" body lift. I'll be sure to leave a little wiggle room around the 33's, for good measure.
Re: build thread from the freezer
Posted: Mon Jul 13, 2015 9:16 am
by Justin
Have you cycled the suspension? I'm curious to see if you've got enough clearance, as I'm going to have to tweak mine some to be able to turn at full stuff.
Re: build thread from the freezer
Posted: Mon Jul 13, 2015 10:52 am
by Gunnibronco
Justin wrote:Have you cycled the suspension? I'm curious to see if you've got enough clearance, as I'm going to have to tweak mine some to be able to turn at full stuff.
I haven't yet, but will soon.
Re: build thread from the freezer
Posted: Mon Jul 13, 2015 1:54 pm
by Kinder
I like, are you going to sneak in a small fresh air duct that leads to the inside of the fender?
Re: build thread from the freezer
Posted: Mon Jul 13, 2015 6:27 pm
by Gunnibronco
kinder wrote:I like, are you going to sneak in a small fresh air duct that leads to the inside of the fender?
Thanks,
I'm hoping to, more or less, isolate the air filter & battery from the engine compartment.
Still need to find a place for the washer tank & radiator overflow. I have the small individual tanks I was using, and a tank from the 97 Mountaineer I parted out.
Re: build thread from the freezer
Posted: Mon Jul 13, 2015 7:22 pm
by Gunnibronco
kinder wrote:I like, are you going to sneak in a small fresh air duct that leads to the inside of the fender?
Maybe you meant as a fresh air duct for the heater?
In that case, no. I'm just going to pull air from the cab.
I'd like to get a fresh air duct to the cab, like the driver side. But now that things are coming together, I doubt that will happen. Not much room left.
Re: build thread from the freezer
Posted: Sat Jul 18, 2015 7:24 pm
by Gunnibronco
Right side inner fender is mounted. Its about 2" higher than normal, and cut way up. With the tire at full stuff, I have more than enough room for my 33's, by a couple inches if I push things around a little.
When I installed my Silverback flares, I did not cut the fenders to the maximum opening. I left them cut where my old traditional flares were. I wanted to leave the extra metal (it doesn't interfere with my 33's), so I can move the flares forward & up. This will happen when I make the jump to 37's. I don't want to overstate how much room I have, but I'm guessing I might be able to get on 37's with no body lift, or maybe 1" (up front).
Not sure if this will help you Justin, my inner fenders are no where near the stock location.
Full stuff, steering straight
P1020958.JPG
The only trimming I'll have to do, about mid way through a left hand sweep
P1020959.JPG
P1020960.JPG
Full stuff, steering full lock to left
P1020965.JPG
Full stuff, steering to right lock
P1020961.JPG
P1020962.JPG
Also cut out the 2 front panels to clear the headlights & turnsignals, so the grill can be bolted to the fenders. And built a couple stand offs that will bolt the fenders to the tubing. Sorry no pics.
Re: build thread from the freezer
Posted: Sun Aug 02, 2015 8:11 am
by Gunnibronco
Front end is almost tacked together.
I tucked a Toyota cooler behind the driver headlight. I'll use it on the power steering system. I've never had a PS problem, but running h-boost & PS, and planning to add hydraulic assist in the future, so some cooling can't hurt.
P1020966.JPG
The radiator overflow location isn't elegant. But it mounts it higher than the top of the radiator.
P1020967.JPG
A couple pics of the fender stand offs. I adjusted the WH lower hood shock mounts to weld directly to the cage. It ended up making a nice middle fender stand off. Love the hood shocks already!
P1020970.JPG
P1020971.JPG
P1020969.JPG
I'll put the washer fluid bottle on the rear of the driver's inner fender. But I need to mount the ZF clutch first, to make sure it all fits.
The air filter is temped in. The long 90* elbow is from my 300C, but it fits nicely, and has a spot for the air temp sensor. I'll replace the black PVC 45 with a metal bend & get a smaller filter. The current filter is rubbing on the cage & inner fender, and probably wouldn't last long before ripping.
P1020968.JPG
Re: build thread from the freezer
Posted: Sun Aug 02, 2015 11:18 am
by Justin
Looking good! It wouldn't be hard down the road to fab a sheet metal box to isolate the filter more from underhood heat.
Re: build thread from the freezer
Posted: Sun Aug 02, 2015 11:36 am
by Gunnibronco
Thanks, its coming along!
I wanted to do a CAI of sorts, but I'd rather get it running. LOL.
You are right, it might be 'down the road'. With the cut back inner fenders, and my scoop vents, underhood heat probably isn't going to be as bad as a sealed up stock truck.
Re: build thread from the freezer
Posted: Wed Aug 05, 2015 3:42 am
by Jesus_man
AEM dry flow offers some various sizes of performance filters. They are washable and not oiled. A cone shape might be perfect for your application.
Keep at it! Love seeing the progress!
Re: build thread from the freezer
Posted: Wed Aug 05, 2015 6:16 am
by Gunnibronco
Jesus_man wrote:AEM dry flow offers some various sizes of performance filters. They are washable and not oiled. A cone shape might be perfect for your application.
Keep at it! Love seeing the progress!
Thanks.
I have an AEM Brute Force now, but its just a little too big. I found another size I think will give me a nice fit.
Re: build thread from the freezer
Posted: Thu Aug 06, 2015 8:52 am
by Kinder
Catching up on threads, looks great! I can shoot a pic of my clutch master cylinder location if it'll help?
Re: build thread from the freezer
Posted: Thu Aug 06, 2015 11:19 am
by Gunnibronco
I'd like to see where you put it, on the firewall, and how you connected the push rod to the pedal.
I've been doing some reading and think I've got it figured out. I won't be using a speedometer cable, my new gauge will be GPS driven. So the speedometer cable hole seems like the spot to use. It lines up very nicely with the clutch pedal & is very close to the highest mounting point available on the pedal. It looks like I can use the pedal bracket mounting bolt for one of the m/c bolts. My h-boost is bolted directly to the firewall, but the clutch m/c will clear, and I think I can put my windshield washer tank on the inner fender, too.
I've read to install a pedal stop to prevent over travel/blow out to the slave cylinder. Are you running one? That also seems fairly easy to build, especially with the dash out.
Re: build thread from the freezer
Posted: Thu Aug 06, 2015 1:40 pm
by Kinder
I'm not using a pedal stop, maybe I should, I wonder if that is why I've ran through so many slave cylinders. I'll pull the pics from my build thread.
Re: build thread from the freezer
Posted: Thu Aug 06, 2015 2:07 pm
by Gunnibronco
So I just bumped into that info on a CB.com thread. Here is a link to some info on setting up a hydraulic clutch that mentions setting the "stop" just after the clutch completely disengages and the truck rolls freely. (page 6)
http://www.hurst-drivelines.com/files/C ... n_Tips.pdf
build thread from the freezer
Posted: Thu Aug 06, 2015 2:30 pm
by Kinder
Here are a couple of pics that should help, I think Brian & Chris used about the same location for their zf5 swaps as well. I can give you exact measurements if needed.
1st pic is engine side of firewall, existing pedal assembly bolts should get you oriented. 2nd pic is inside, large hole is where the steering column goes. I used a second brake pedal for a clutch pedal since it had the pivot in the right spot. Thanks for the link.


Re: build thread from the freezer
Posted: Thu Aug 06, 2015 6:52 pm
by Gunnibronco
Thanks for the pics. My Mustang h-booster has a inlet/outlet adapter block on the side. This would interfere with mounting like you did. The location I want to use will mount the master slightly lower. Hopefully this won't make the pedal too stiff. I think it will be ok, I saw more than a few pics on CB.com with the lower mounting location.
Re: build thread from the freezer
Posted: Thu Aug 06, 2015 7:13 pm
by biohzrd
nice build...what if you were to rotate the booster 90 degrees?
and is your steering cooler going to see any airflow where it's at?
Re: build thread from the freezer
Posted: Thu Aug 06, 2015 7:17 pm
by Gunnibronco
I tried rotating the booster when I installed my EFI. All positions interfere with something. Right now its a few degrees off vertical to clear the upper intake.
The steering cooler & air filter are each behind a large (7"ish) hole I cut to clear the headlights. Its not ideal, but I didn't want to block any of the radiator. Overheating hasn't ever been a problem, so it will only help. I'm going to baffle things as well as possible, to force air through the radiator, and those 2 headlight holes.
build thread from the freezer
Posted: Thu Aug 06, 2015 7:35 pm
by landshark
Re: build thread from the freezer
Posted: Tue Sep 01, 2015 9:56 pm
by Gunnibronco
I haven't been super productive, but just to prove I haven't stopped working completely.
I added 2 diagonal crossmembers to the roof of my cage, and 2 across the floor. I'm reworking the hi-lift mount, slightly. I'm figuring on building or buying a new storage box that will bolt to the rear cage & floor, and fit behind the rear seat (if I ever decide to put it in).
P1020977.JPG
P1020978.JPG
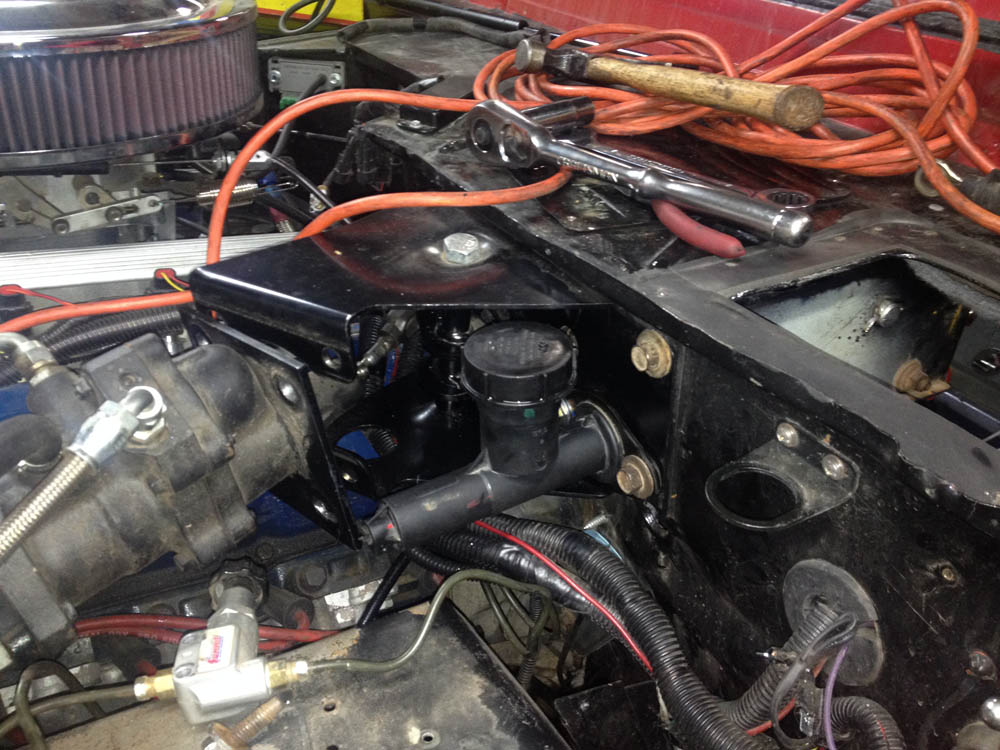
Reamed out the speedometer cable hole in the firewall, and bolted the clutch master to the firewall. Working out a longer m/c push rod & mount to the clutch pedal.
P1020974.JPG
Re: build thread from the freezer
Posted: Mon Dec 14, 2015 6:39 pm
by Gunnibronco
I have actually been able to spend a few evenings in the garage, in the last week or so. Mostly fussing with the doors. And getting reacquainted with the project & what is left to do.
I have finally ordered a proper garage heater. It should arrive in a week or two.
http://www.mrheater.com/big-maxx-natura ... -1193.htmlI am planning the next steps of the project, and have read some interesting/conflicting ideas on engine/trans/tcase mounting. Hoping to get some thoughts.
I want to install new motor mounts, just because. I can't use any mount taller than stock. My motor almost touches my hood now, and the transmission & part of the tcase is looking to be 1"-2" higher than the existing trans tunnel & floor between the seats. I can't have it any higher. Most/all the stock style motor mounts seem to be rubber.
The combined length of my ZF5 and Atlas 4 speed is ridiculously long. My plan has been to mimic JD's mounting plan. A DOM sleeve with bushing mount under the rear of the transmission. And another Atlas specific bushed DOM mount, at the rear of the Atlas. (JD I hope you don't mind me using your pics)
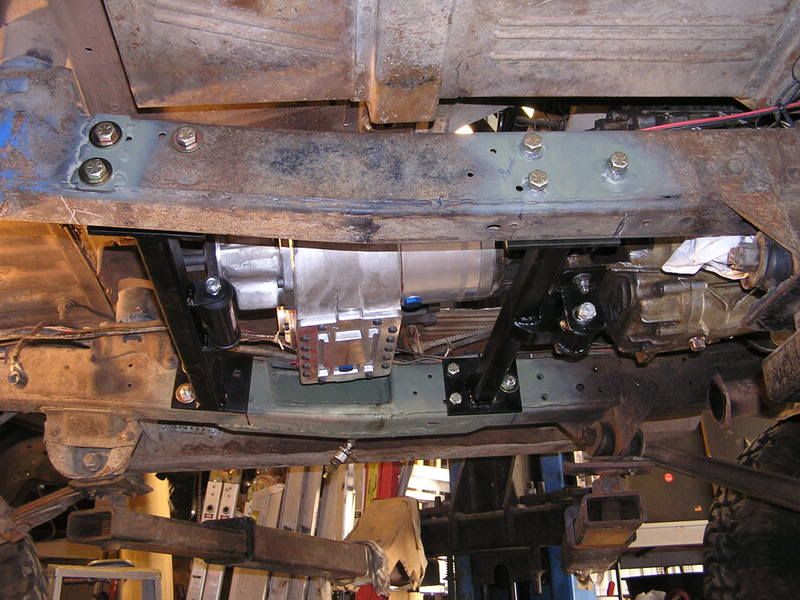
[/URL]
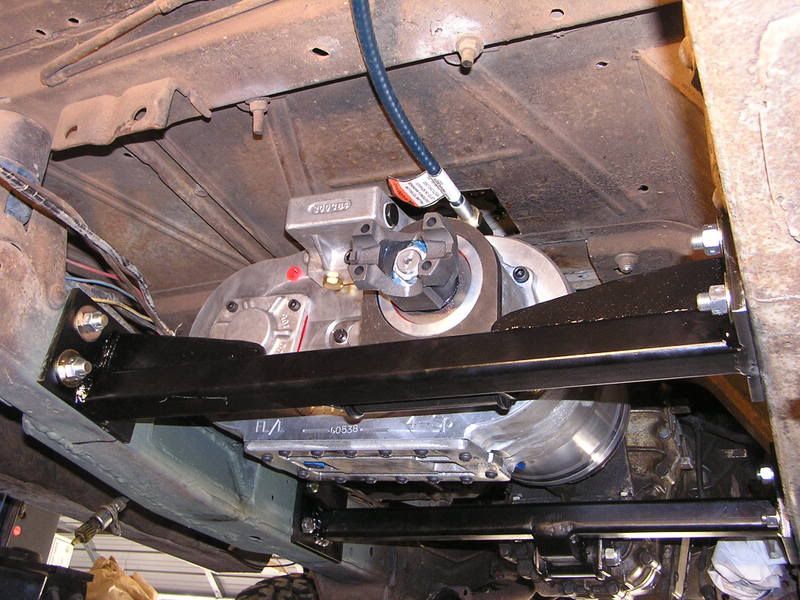
[/URL]
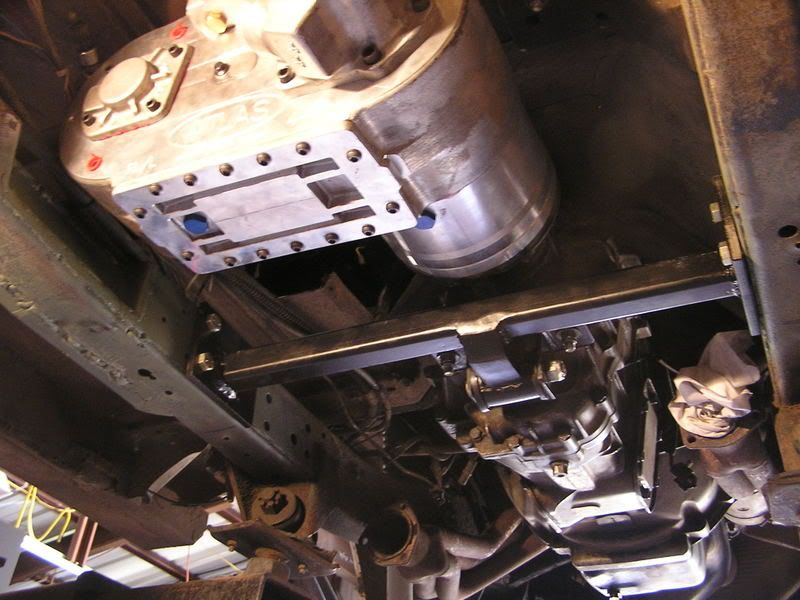
[/URL]
My Atlas won't be clocked flat, so it won't be exactly the same.
This seems to have worked for JD. But I read using 3 mounting points (engine, trans, & tcase) can lead to broken trans mounts when things get torqued. It was recommended to only use 2 frame mounts. Leaving the transmission "hanging" with no mount, between the frame mounted engine & tcase. Thoughts?
I also read that you should use the same material throughout all your mounts. All polyurethane or all rubber. Mixing them can also lead to broken pieces parts.
It seems hard to find a stock height polyurethane motor mount. Should I look to find rubber bushings for my trans/tcase mounts? Or should I just not worry about it?
Re: build thread from the freezer
Posted: Wed Dec 16, 2015 7:43 am
by Jesus_man
Glad my pictures can help, so feel free!!
You might recall, my mounts are part support and part skid plate mount. I knew hanging the atlas off the back of the tranny and only using a tranny support would end up in a tail housing failure. But I never considered skipping it and just using a t-case mount. You're not planning to baja this thing, but the drivetrain will see a fair amount of bouncing down the roads. I would be inclined to use some sort of bump-stop setup for the tranny if you don't want to "Solid" mount it. You might be able to attach a plate to the tranny and pinch it between two bump stops to keep it in place??
What I have has worked fine. I have torqued the system up enough to blow out the rear yoke on the Atlas (that was a loud bang) and I saw no adverse affects anywhere else. Knowing that your rig is more of a DD than a trail machine, I wouldn't think you'd have trouble mounting it like I did. I'm saying if all you did was crawl, every weekend then I can see some concern, but if you had the coin and time for that, you wouldn't be too worried about broken parts.
Re: build thread from the freezer
Posted: Wed Dec 16, 2015 7:48 am
by Gunnibronco
Good points, thanks. I think you are right. I like the bumpstop idea for the trans, if I were to go that way.
Re: build thread from the freezer
Posted: Mon Jan 04, 2016 6:51 pm
by Gunnibronco
I installed the unit heater over Christmas. It works pretty well, and makes the garage workable. It takes some time to heat up. Its been sorta cold, a few -27* mornings and a -33* low recently. The garage is hovering around 12* and can be heated to 50* in about 3 hours. But it only takes a few minutes to take the chill off. Next summer I'll make some improvements & add some insulation to the garage that will help a lot.
P1030154.JPG
I've installed my skeletonized dash to prefit gauges & controls, steering, and wire the truck. And, of course the ZF shifter is going to cause problems. Looks like I'll be notching the dash and maybe heating/twisting the ZF shift stubb. I doubt I'll be using the stock shifter handle, probably have to bend up some round stock.
As much work as the front cage has been, and how much work is going into fitting the ZF & Atlas without a body lift, I'm considering that I may never add a body lift. I'm thinking that I'm going to clock the Atlas as flat as possible, without getting into the drivers seat/floor. There will probably be some frame notching. Unfortunately (of course) the rear 1" or so of the Ruffstuff link bracket may come into play.
I've got new motor mounts coming, and hope to start fitting the Atlas this weekend, maybe.
I went ahead & cut out the floor between the front seats. I can't see being able to fit the Atlas with any smaller hole. I've now cut two floor braces, and there is some flex in the floor. As part of the new tunnel cover, I'm going to have to add some bracing back.